A polished concrete floor burnished, stained, guarded and polished up to 3,000 grit; can be quite a sight to behold. Many clients prefer a polished concrete floor as the perfect fit for their projects despite the fact that most concrete floors are far from being perfect slabs. Some of the common flaws associated with concrete include: pop-outs, pinholes, gouges, spalling joints and cracks.
These flaws not only interfere with the aesthetics of the polished concrete, but can also have a negative impact on the functionality of the entire building. They cause problems like trip hazards or can also act as bacteria collection points in sanitation sensitive buildings, such as hospitals and food processing plants.
As far as high-end floors are concerned, these various types of flaws are completely unacceptable. Fortunately, the construction industry has evolved to the point where it appears every flaw can be properly addressed.
Also Read:Proper Concrete Repair Solutions can save you money
Small hole and defect repairs
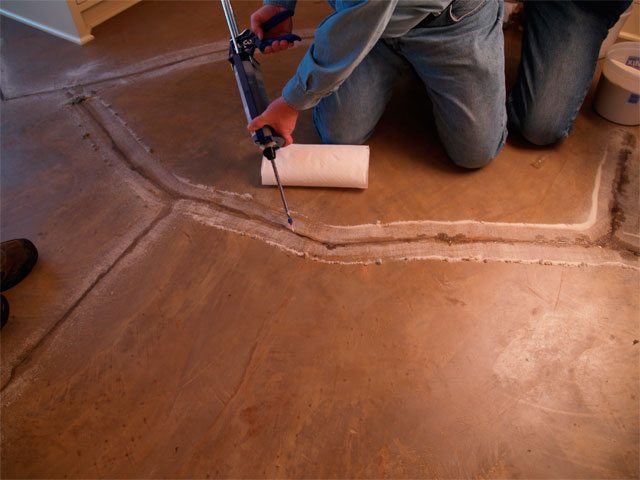
When one is dealing with small cracks and holes (those below 1/8 inch wide), it is highly advisable to use a polyurethane/polyurea polymer.
The process involved in repairing a chip in the concrete surface is quite simple. First, start by clearing all debris from the defect, and leave it in its structural concrete form. Next, moderately overfill the flawed area using the selected polymer. If the floor repair involves grinding and polishing, it is important the material used for repair be applied after the initial coarse grind.
It is also important to give the selected polymer time to harden. The given time will depend on the polymer selected for repair; then the overfill material can be removed. If the polymer is put during the course of grinding, simply move on to your next grit.
Furthermore, it is quite important to note that stronger polymers need aggressive tooling of 100 grit or more. If the repair does not involve grinding, the excess can be cleared off using a cup-wheel grinder and a medium-grit pad. After adopting this process, the repaired polished concrete floor could be ready for traffic again in as little as 30 minutes. Repair of minor flaws is easy and can turn a potential safety hazard or unsightly blemish into something barely noticeable.
Joint separation
The simple fact of the matter is that concrete shrinks. Evidently, previously filled joints that have opened up and left tears or voids in the installed joint filler are quite common. A model concrete slab contains more water than is needed to activate the cement. Over time the moisture begins to leave the slab through evaporation, reducing the overall size of the concrete slab in the process. The usual rate of shrinkage in a 6-inch slab is 1/8 inch per every 20 feet. This means that if one has 15-foot panels, each 1/8-inch saw-cut joint will in due course open to almost 1/4 inch, an expansion of close to 100 percent.
In case of a separation, 1/32 inch, or approximately the width of a credit card, is the magic number. Hairline voids are likely to occur, but will rarely be cause for worry. What is important is separation between the filler and slab. The main worries here are if the separation will lead to joint edge deterioration over time (especially with seasonal changes impacting on the level of separation) or if sanitation is a concern. If either of these includes the issues being faced, then the joint should be addressed.
When it comes to repairing filler separation, there are two main options involved. The first option involves cleaning out the separation voids by removing loose debris mechanically or with compressed air and then refilling it with a fast-setting semi-rigid polyurea; or slower-setting epoxy joint filler. The second option involves ‘milling out’ the top 1/2 inch of filler using a saw, and then utilizing an epoxy or polyurea polymer to refill. Each of these methods has its own advantages and disadvantages, but both will get the job done.
Color-matched joint filler
Having a mismatched joint filler color on a beautifully polished or colored concrete floor can be quite a depressing site to behold. With the options for concrete colorants becoming virtually limitless, the ability to match joint and repair material to the substrate has followed suit.
Repairing polished concrete floors can be problematic sometimes, so it’s good that you’ve shared a simple guide here. I appreciate this guide, and I will utilize this information for repairing floors.
It’s great to know that all of those tiny cracks can be filled in properly with a polymer. My brother has a building with polished concrete floors on the ground. He needs to reach out to a professional service that has a lot of experience with polished concrete floors so that he knows things are being done properly.
These are some great information that you have shared here about repair polished concrete floors. I really loved it and thank you very much for sharing this with us. You have a great visualization and you have really presented this content in a really good manner.
Thanks for this resourceful article. I have just bookmarked this page so I don’t miss any more of these.
We are interested in repair of polished concrete